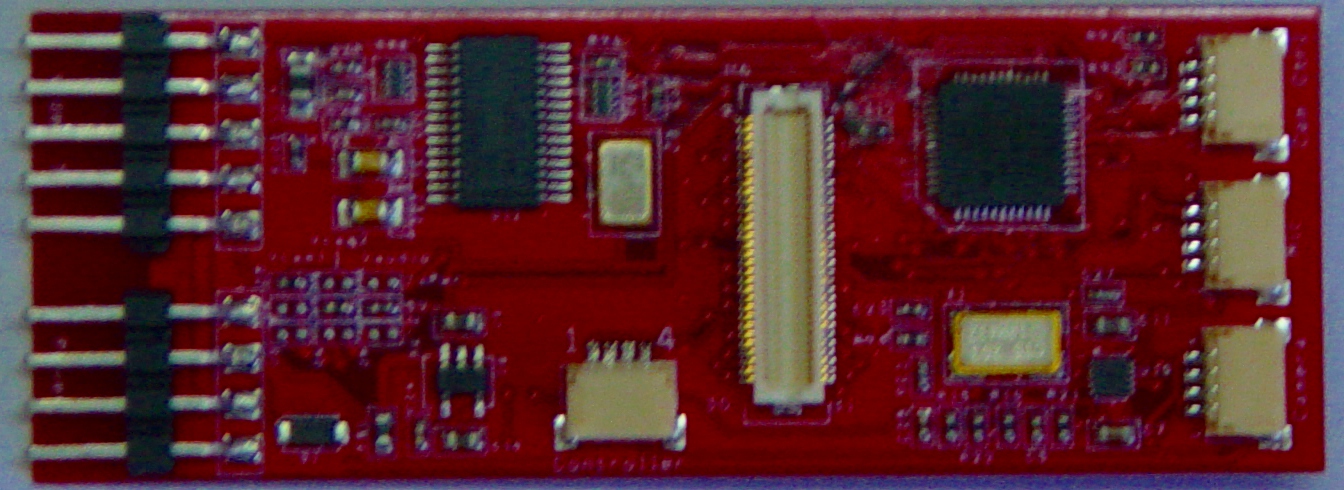
RubyOSD is designed to minimize bulk and complexity of cabling.
It just snaps on to Ruby and provides a compact, convenient hub for power, video, and audio wiring. |
Connection to Ruby
RubyOSD simply snaps on top of the Ruby Controller or Expander. It can be stacked between the Controller and Expander or on top of the Expander.
It's possible to plug RubyOSD into Ruby in the wrong orientation, which can damage your system. Be sure that the servo style pins on RubyOSD are on the same side as those on the Ruby Controller and Expander.
Alternatively, you can connect RubyOSD to Ruby via a thin ribbon cable. On some installations, doing this can allow you to locate RubyOSD next to the video transmitter and camera, reducing bulk of cabling and length of cables carrying video and audio . [more info...]
Cabling to suit your components
We may be able to provide you with cables which allow solderless connections to various brand video cameras and transmitters. If we can't do that, we'll simply provide headers with tinned wires for you to solder directly to the ends of cables for your equipment.
Send an email to sales@uthere.com and let us know what transmitter and camera models you're using. If we can't find sufficient information on the web about them, we'll ask you to tell us their voltage requirements. We'll ask for pinout, and a closeup of the units' connector if you'd like a solderless connector.
Let us know desired lengths of cables.
click here to enlarge
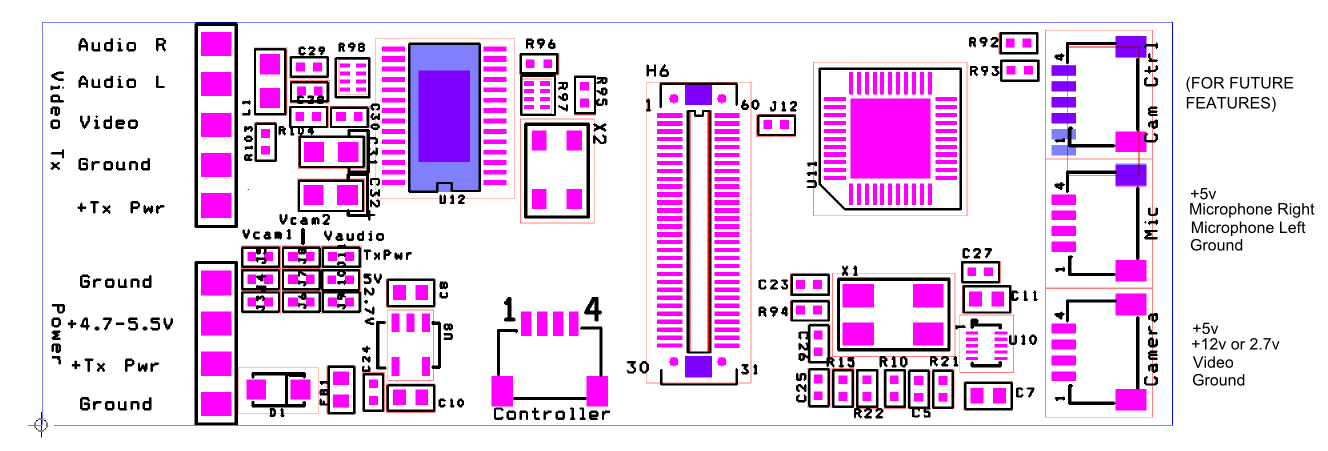
Connection to power input
A 4 pin connector physically similar to a servo connector is used to provide power to your entire video system including RubyOSD, camera, microphones, and video transmitter.
For custom cables, we'll provide an empty connector housing and female pins that you can crimp or solder onto your wiring and insert into the housing.
Although it's possible to use a regular 3 pin connector, we recommend using the provided 4 pin connector to reduce chance of plugging across the wrong pins and possibly damaging your system.
!! WARNING: Be very careful when plugging the power connector into RubyOSD. If this connector is plugged in upside-down, it will feed 12 volts into the 5 volt input and destroy your entire Ruby system!
| Power Input Pinouts |
| Ground |
Optional second ground. You will typically only use this if using the +4.7 to 5.5 volt connector. |
| +4.7 to 5.5 Volts |
This is optional, and usually not necessary since RubyOSD also draws +5v power from Ruby through the 60 pin "piggyback" connector. It should only be used if you have something drawing heavy (more than 200 ma) +5 volt power from the RubyOSD board. |
| TX Power |
This will be routed on the RubyOSD board to the + power terminal for the transmitter. You'll most commonly connect this to +12 volts / 3S Lipo, but might connect to +5V or some other voltage depending on your transmitter's requirements. |
| Ground |
Always connect this to ground. |
Connection to video transmitter
A 5 pin connector physically similar to a servo connector is used to connect to your video transmitter.
This is plug-and-play compatible with FatShark transmitters, but we also provide an empty connector housing and female pins that you can crimp or solder onto other transmitter cables so that it can plug conveniently into this connector.
Although it's possible to use a regular 3 pin servo connector if no audio output is used, we recommend using the provided 5 pin connector to reduce chance of plugging across the wrong pins and possibly damaging your system.
Still, note that there is no polarity protection. If you plug in the video transmitter connector upside-down, you may destroy your transmitter.
| Video Transmitter Output Pinouts |
| Audio R |
Output for right audio / microphone channel. |
| Audio L |
Output for left or monophonic microphone channel. |
| Video |
Video signal output |
| Ground |
Always connect this to ground. |
| +Tx Pwr |
Transmitter + power. This is simply connected internally to "+ Tx Pwr" in the power input. Typically this will be +12 volts. |
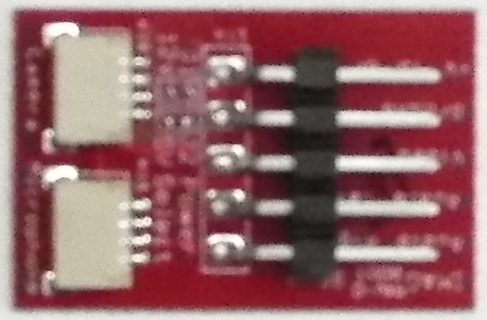
Connection to the camera
A micro "JST SR" connector is used to provide a compact connection from your video camera into RubyOSD.
 FatShark(tm) adapter: FatShark(tm) adapter:
An adapter is provided which provides larger servo-style pins compatible with FatShark video cameras. We also provide an empty connector housing and female pins that you can crimp or solder onto other brand camera cabling to make it compatible with this adapter.
Note that the adapter has a jumper that allows you to select between +5V and higher voltage transmitter power (typically 12V) which may be required for your camera. Examine the adapter to confirm which voltage has been selected. A soldering iron is required to move the jumper. Be sure that there is exactly one jumper in place - either on +5v ("J2") or +12v ("J1").
You can also request that we ship one of these adapters with the jumper already in place to provide +5v or +12v.
A more compact cable:
For a much more compact connection, you can cut one of the 4 conductor ribbon cables that we provide in half, separate the wires at the end, and solder directly to your camera cabling.
Don't forget to slide on the heatshrink tubes before soldering the wires. Twist the ends of the wires together and keep the soldered section short because it is relatively stiff and brittle. Slide the larger heatshrink over all of the connections.
Note that one wire carries +5V while the other carries transmitter power (typically 12 volts).
** Before you plug your camera in for the first time, it's a good idea to use a multimeter to make one final check to be sure that your wiring / jumpers is providing the correct voltage for your camera.
** Be careful to never create a short between +5v and +12v circuits. A test probe or single strand of wire shorted between the +5V and +12V can destroy your entire Ruby system.
Be careful not to confuse "Camera" with "Cam Ctrl" or "Mic". All accept the same size 4 conductor "JST SR" connector.
| Camera Input Pinouts |
| +5V |
This is connected to the 5 volt power bus inside RubyOSD, which is powered through the 60 pin connector to Ruby, or via the "+4.7 - 5.5V" external connector.
Leave this connector unconnected if your camera does not operate on 5 volts.
Note: Ruby and RubyOSD have "reverse protect diodes" which will cause this to be 0.3 volts lower than the voltage that you provide. In other words, if you provide Ruby / RubyOSD with 5.0 volts, this output will provide only 4.7 volts to the camera. Some cameras will not function below a strict 5.0 minimum voltage. You may need to adjust your BEC (BECs from Castle can be programmed) or contact support@uthere.com to learn how to bypass the reverse protect diode. |
| +12v or 2.7v |
If your camera does not operate with +5 volt input, this will either be connected internally on the RubyOSD board to "Tx Pwr" (typically 12 volt) or an onboard 2.7 volt regulator. |
| Video |
Video signal from the camera |
| Ground |
Always connect this to ground. |
Connection to Microphones (optional)
| Microphone Input Pinouts |
| +5V |
This is connected to the 5 volt power bus inside RubyOSD, which is powered through the 60 pin connector to Ruby, or via the "+4.7 - 5.5V" external connector. |
| Microphone Right |
|
| Microphone Left |
|
| Ground |
Always connect this to ground. |
"Cam Ctrl"
This is reserved for upcoming advanced features. Be sure not to plug a video or microphone cable into "Cam Ctrl" accidentally.
"Controller" (Connecting RubyOSD remotely via cable to Ruby)
This serial port provides an alternative to stacking RubyOSD on top of Ruby, allowing you to locate RubyOSD remotely. In some installations, this can allow you to reduce cabling and the length of cable carrying video and audio signals - you just locate RubyOSD out where you have your video tx and camera located.
Simply connect a 4 wire ribbon cable between "Ser2" on the Ruby Expander and "Controller" on RubyOSD, and provide +5V power to the power input pins on RubyOSD. The cable is the same as is used to connect to Ruby's GPS and USB modules and to connect to the "FatShark" adapter. Contact sales@uthere.com if you need an extra cable. Let us know desired length and if an extension connector is needed (if RubyOSD is to be mounted out on a wing that you wish to be able to easily attach in the field).
Power Filtering
If you power your video transmitter or camera from the same power supply used to power the motor, static may (or may not) appear unless the power supply is filtered heavily. Likewise, radio energy could be transmitted through power lines and affect receivers.
RubyOSD doesn't have any onboard power or RF filters, but you're free to put whatever 3rd party filter you want in series with the power fed into RubyOSD or going from RubyOSD to VTX. uThere doesn't currently sell any yet, but [this one] from ReadyMadeRC appears to work well.
|