(Note that much of this configuration will normally have been performed for you by AgEagle.)
Install CHDK
For Canon S-100: [more info]
For other cameras: [more info...]
Formatting the card:
There is some small possibility that the camera will have a different firmware, in which case you may have to use a program called STICK by Dave Mitchell: http://zenoshrdlu.com/stick/stick.html to put the correct version on the card. It takes about two minutes. You basically just take a picture with the camera, insert the card, drag the picture to the program and it gets the correct version of CHDK and formats the card. It is ok to erase the card I'm sending if necessary.
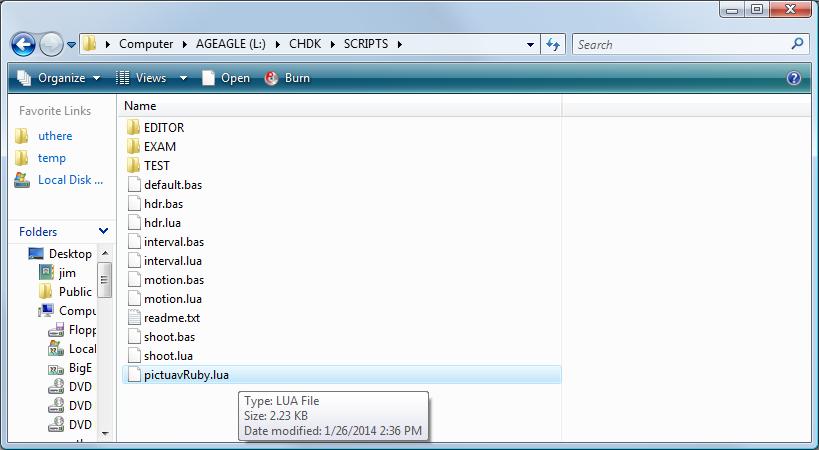
Download pictuavRuby.lua to your computer. [download]
Place pictuavRuby.lua into the CHDK/SCRIPTS folder.
Slide the "lock" tab on the SDFlash to "locked". This will cause CHDK and possibly a script to load when the camera is powered. Surprisingly, this will not prevent the camera from saving recorded images to the SDFlash. If the tab is not in the "lock" position, the camera will operate normally without loading CHDK.
Camera settings:
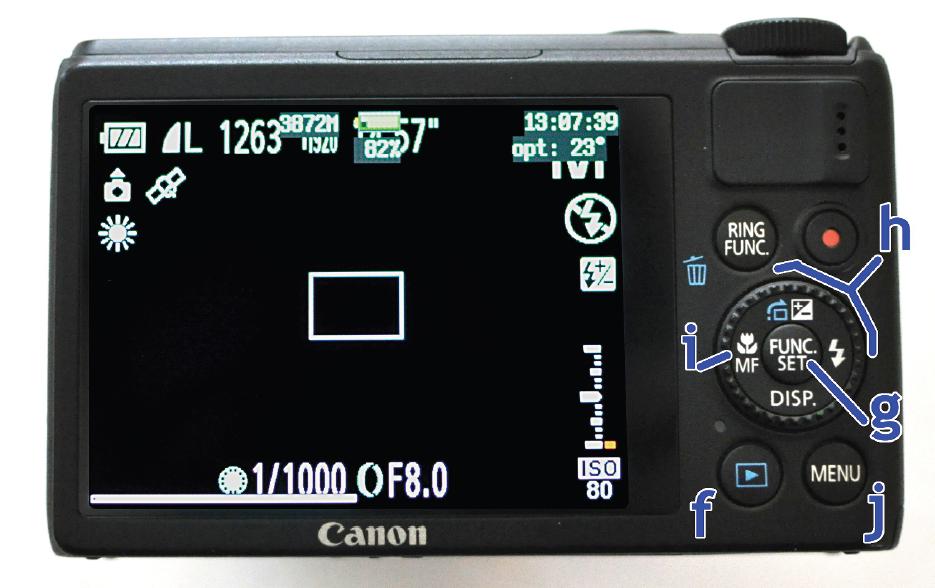
Press Menu button [j]
under the Camera tab:
| Digital Zoom |
OFF |
| AF-Point Zoom |
OFF |
| Servo AF |
OFF |
| AF Assist Beam |
OFF |
| MF-Point Zoom |
OFF |
| Safety MF |
OFF |
| Review |
OFF |
| Date Stamp |
OFF |
under the tools icon:
| Time zone |
Set to "World" time with the time zone containing Greenwich Englind selected.
(This makes it easier to synch pictures with position / orientation info recorded by the autopilot.) |
| Time Update |
On |
| GPS |
On |
| GPS Logger |
Off |
| Lens Retract |
0 sec |
| Auto power down |
OFF |
| Display Off |
10 sec |
Press the "Func. / Set" button:
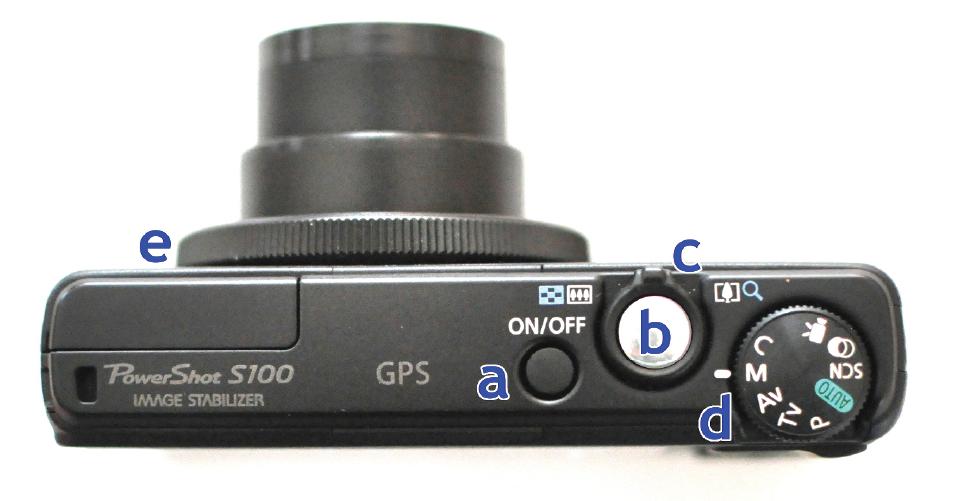
Turn Mode Selector to Manual
| Still Image Aspect Ratio |
4:3 |
| Image Format |
JPEG 12M 4000 x 3000 |
| Image Size / Quality |
12M 4000 x 3000 |
Hit Func./Set(g) and navigate down to the 3rd menu item from the top.
Move right to select "Day Light" white balance (the sun icon).
Move back up one to ISO. Move left/right to set ISO to 100 then Func/Set to enter.
Turn Control Ring(e) to F8.0
Spin the Control Dial(h) to shutter 1/1000
CHDK settings
Enable USB remote:
Go to the CHDK menu (press playback button. A red "ALT" should appear at bottom of screen. Then press the menu button)
Go to: Main Menu: CHDK Settings : Remote Parameters
(formerly
Main Menu: Miscellaneous Paramters : Remote parameters on older version of CHDK)
| Enable Remote |
[*] (on) |
| Switch Type |
[None] |
| Control Mode |
[None] |
| Enable Synch |
[ ] (off) |
| Enable script start |
[ ] (off) |
(other settings are ignored)
Make pictUAVRuby.lua load automatically at startup
Go back to the main CHDK menu and select Script (program your camera). Then select Load Script from File and select PICTUA~1.LUA. Then turn AutoStart to On. Now when you power up the camera (with the lock tab engaged on the SDFlash card), you should see the pictUAV program starting up automatically.
Note that pressing the shutter trigger button will stop the script, and pressing again will restart it.
Final preparation of camera for mission
Confirm camera is in Manual mode
Confirm Camera is in "Day Light" White Balance (look for the sun
icon)
Confirm GPS is acquired (look for satellite icon w/o the
Ghostbusters-looking business)
Test exposure by half pressing the shutter button while aiming at
the horizon with back to the sun. Target exposure of +/- ⅓. To
adjust exposure, step through settings while testing exposure after
every step in the following order:
iso no higher than 400 - Func./Set(g) + 4 way(h)
f-stop no smaller than 4.5 - Control Ring(e)
Shutter no slower than 1/800 - Control Dial(h)
Press the MF button (i) and press right on the 4 way and then
Func./Set to select Manual focus. Focus bar will appear on the right
of the screen.
Spin control dial (h) up to set focus to infinity
Press Play button (f) to toggle on CHDK
Ruby configuration
Ruby firmware version 769 or later is required.
Contact support@uthere.com to obtain required firmware and configuration.
You will probably not need to change configuration from the defaults provided by uThere.
Ruby settings for control of the camera can be reviewed in uThere Ground Control:
View: Variables: photography: configuration:
| variable name |
description |
default value |
| handheld_map_wire_into_photo_camera_switch |
Transmitter channel used to manually control retract / prefocus / shutter trigger.
Optional. Not needed for autonomous photosurvey. Set to 0 if not used.
Can be used with a 2- or 3-position switch:
top:continuous shutter
center: extend / prefocus
bottom: retract |
0 |
| photo_interval_min_default |
Shortest interval between images.
Shutter will be triggered at this interval as long as plane is not maneuvering or experiencing turbulence.
1 second is the minimum possible with Canon PowerShot. |
1 second |
| photo_interval_max_default |
The longest interval allowed between images while waiting for plane to become level and steady.
A shutter trigger will be "forced" if the plane has not become "level and steady" within this much time since previous trigger. |
2 seconds |
photo_criteria_roll_pitch_max_default
|
Plane is considered "level" if target and actual pitch and roll are less than this value. |
20 degrees |
photo_criteria_roll_pitch_rate_max_default
|
Plane is considered "steady" if anglar pitch, roll and heading are less than this value. |
20 degrees per second |
| photo_retract_altitude |
Automatically retract lens below this altitude.
|
150 ft AGL |
| photo_prefocus_altitude_agl |
Automatically prefocus above this altitude
(NOT CURRENTLY USED - SET CAMERA TO MANUAL FOCUS) |
200 ft AGL |
Cabling between Ruby and Camera
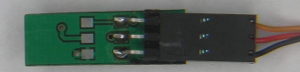
Ruby to adapter
Select the thin ribbon cable with a small 6 position connector on one end and a 3 position connector on the other. Connect one end to the "Panel" connector on the Ruby Expander and the other into the 3 position connector on the adapter if it is not already attached.
Select the cable with 3 position servo plugs on both ends. Connect one end to any unused servo output on channels 1-6. (channels 7-9 can only be used if an Expander Spanner is attached to Ruby.) Connect the other end to the "input" side of the adapter if it is not already attached. *** Be mindful of polarity. It should look like this:
Adapter to Camera
Select the thin cable with a small 2 position connector on one end and a USB mini plug on the other.
Plug the USB mini plug into the side of the Canon camera.
Plug the other end into the 2 position header on the adapter if it is not already attached.
Note: Although the cabling connects to the USB port, it does not provide power to the camera. Be sure that your camera battery is charged before each mission.
Preflight Testing
When you initiate a preflight, Ruby will send a command to the camera to prefocus, shoot, and retract the lens.
It's a good idea to run a preflight in your shop before heading out to the field to confirm that everything is working correctly.
Note: if configured for manual operation, Ruby will not extend the lens or shoot if altitude is below photo_retract_altitude (default 150 ft AGL). The only way to test on the ground is to perform a preflight or set photo_retract_altitude to below 0 feet.
Flight Operation
While in waypoint mode, Ruby will extend the lens and prefocus as the plane approaches the first waypoint, then shoot continously as the plane proceeds between waypoints, pausing only as the plane banks to turn from one waypoint to another or is rocked by turbulence. Upon reaching the last waypoint, Ruby will retract the lens.
Log files
The pictuavRuby script will record detailed logs with high resolution timestamps of all actions including photo trigger to log files. These can be useful for flight location and orientation info recorded by the autopilot with photographs, and for troubleshooting.
One log file named "pictuavRuby_log.txt" will be placed in the directory in the DCIM directory containing photos taken, while a copy of log data is appended to a cumulative log file named "DCIM/pictuavRuby_master_log.txt"
pictuavRuby also generates a file called DCIM/pictuavRuby_properties_dump.txt which contains all camera settings. This can be used by support@uthere.com for troubleshooting.
Troubleshooting
Lens extends and retracts repeatedly, script does not appear to be running.
If the lens extends and retracts repeatedly when connected to Ruby and you do not see messages such as "usb pulse" appearing on the screen, you have probably not slid the "lock" tab on the SDFlash to the "locked" position to cause CHDK to load and the pictuavRuby.lua script to execute. (The camera will not properly handle the pulses coming from Ruby on the USB connector unless the pictuavRuby.lua script is running.)
Technical details
Communication with CHDK via the USB connector is only possible using the USB power detect circuit, not the USB data lines.
Different commands (prefocus, shoot, and retract) are indicated by Ruby to pictuavRuby using different pulse lengths. Retract = 90 millisecond pulse, extend/prefocus = 45 millisecond, shoot = 15 millisecond.
In the camera display, "USB pulse <number>" will appear every time a pulse is detected, with <number> = milliseconds * 10. The time resolution of the pulse detect function in CHDK is approximate, so a 90 millisecond pulse may appear as "USB pulse 9" or "USB pulse 8", etc... Any value above "6" is assumed by pictuavRuby.lua to be "retract". "3" to "6" = prefocus, and "0" to "2" = shoot.
During normal operation, Ruby will continuously send a retract pulse (90 milliseconds) every 2 seconds when the camera is to be idle. Once at startup and once at the beginning of each preflight, it will send one prefocus and one photo shoot command before resuming continuous retract commands.
There is no flow of information back from the camera to Ruby. Ruby sends pulses "blindly" and assumes that each command requires a fixed amount of time to execute and that commands are always successful. Ruby will not attempt another command until fixed amount of time has elapsed.
